简而言之,Mybatis是JDBC的升级版,升级在哪些方面呢?
1、JDBC是实实在在的编程化操作,而Mybatis已经进化成了配置、注解化操作
2、Mybatis将很多JDBC代码内置了,不是工具类,胜似工具类
作为一个overview,先来简单说一下Mybatis进行select操作的流程: 环境准备:Maven仓库导包,建好数据库,建好pojo类…
第一步,设置mybatis的核心配置文件,mybatis-config.xml
1 2 3 4 5 6 7 8 9 10 11 12 13 14 15 16 17 18 19 20 <?xml version="1.0" encoding="UTF-8" ?> <!DOCTYPE configuration PUBLIC "-//mybatis.org//DTD Config 3.0//EN" "http://mybatis.org/dtd/mybatis-3-config.dtd"> <!--configuration核心配置文件--> <configuration> <environments default="development"> <environment id="development"> <transactionManager type="JDBC"/> <dataSource type="POOLED"> <property name="driver" value="com.mysql.jdbc.Driver"/> <property name="url" value="jdbc:mysql://localhost:3306/mybatis?useSSL=true&useUnicode=true&characterEncoding=UTF-8"/> <property name="username" value="root"/> <property name="password" value="123456"/> </dataSource> </environment> </environments> </configuration>
这东西都已经叫核心配置文件了,必然有它叫这个名字的意义,用于配置各种参数,在后面mybatis被spring接管之后,这个配置文件仅仅就剩下setting的几个功能了。
在这里,它用于接入JDBC连接,连上数据库。
第二步,编写Dao层的接口
1 2 3 public interface UserDao { List<User> getUserList(); }
这一步,仔细来看,实际上是做整个Dao层的顶层设计,想必大家肯定也做过学校的各种项目式作业,老师一般也都会给一个接口文件,让大家根据接口文件来实现功能,此处也是一样的意思。
第三步,实现这个接口,配置Mapper
1 2 3 4 5 6 7 8 9 10 11 12 13 <?xml version="1.0" encoding="UTF-8" ?> <!DOCTYPE mapper PUBLIC "-//mybatis.org//DTD Mapper 3.0//EN" "http://mybatis.org/dtd/mybatis-3-mapper.dtd"> <!--namespace=绑定一个对应的Dao/Mapper接口--> <mapper namespace="com.kuang.dao.UserDao"> <!--select查询语句--> <select id="getUserList" resultType="com.wang.pojo.User"> select * from mybatis.user </select> </mapper>
这一步的意义在于实现这个接口,和servlet里的Impl类一样,只是在这里换成了配置文件的方式实现。
第四步,在核心配置文件中注册mapper
1 2 3 <mappers>//注意此处 <mapper resource="org/mybatis/example/BlogMapper.xml"/> </mappers>
其实更推荐用class的方式注册,但是这里简单提一下resource的方式,因为是目录式注册,所以必须要使用 / 而不是 . 进行连接。
接下来就一一介绍各个步骤到底在干什么: 首先是第0步,建立pojo类: 这一步看似最简单,实际上也有学问,在建立pojo类时,应该把属性和数据库的列名完全一一对应,如果出现不对应的情况,就会出现某个属性对应不上的情况,为什么会出现这种情况呢?
那么在这里先要介绍mybatis的执行过程了,执行开始的时候,连接数据库,数据池这种就不赘述了,mybatis会先扫描pojo类,并得到里面的属性名,把这些属性名和数据库的列名进行比较,一样的一一对应,之后才会根据xml配置中的sql语句走。
那么,如果出现对不上的情况该怎么办呢?
resultMap前来帮忙—这是Mybatis里最强大的一个功能,功能很简单,把pojo类和colomn名进行自定义映射。
在前面中提到的
mybatis会先扫描pojo类,并得到里面的属性名,把这些属性名和数据库的列名进行比较,一样的一一对应,之后才会根据xml配置中的sql语句走。
实际上,就是这个resultMap进行的工作,也就是说,如果你起的pojo属性名和数据库中的列名一致,它会自动扫描成功一一映射,根本不用人进行设置。
如果不一致,只需要改动映射关系即可
1 2 3 4 5 6 7 8 9 10 11 <!--结果集映射--> <resultMap id="UserMap" type="User"> <!--column数据库中的字段,property实体类中的属性--> <result column="id" property="id"/> <result column="name" property="name"/> <result column="pwd" property="password"/> </resultMap> <select id="getUserById" resultMap="UserMap"> select * from mybatis.user where id = #{id} </select>
第一步,建立核心配置文件 把他可以看作是mybatis的总setting,让人感到无奈的是,设置它的标签竟然有严格的顺序特征,不过好在IDEA会自动提醒顺序。
1 2 3 4 5 6 7 8 9 10 11 12 13 configuration(配置) properties(属性) settings(设置) typeAliases(类型别名) typeHandlers(类型处理器) objectFactory(对象工厂) plugins(插件) environments(环境配置) environment(环境变量) transactionManager(事务管理器) dataSource(数据源) databaseIdProvider(数据库厂商标识) mappers(映射器)
这里只需要记住,properties在第一,settings在第二,别名(typealiase)在第三就可以了
(剩下的那些都可以丢给spring接管)
mapper注册一定要放在最后,这里注册有三种方式,前面介绍了一种了,下面介绍最常用的一种。
1 2 3 4 <!--每一个Mapper.XML都需要在Mybatis核心配置文件中注册!--> <mappers> <mapper class="com.wang.dao.UserMapper"/> </mappers>
但是一定要注意:
接口和他的Mapper配置文件必须同名!
接口和他的Mapper配置文件必须在同一个包下!
再重点说一下别名设置,
可以给类型起别名,但是用的非常少,最常用的是包名别名
也就是扫描这个包,它的默认别名就是这个包下类的类名,首字母小写
1 2 3 4 <!--可以给实体类起别名--> <typeAliases> <package name="com.wang.pojo"/> </typeAliases>
第二步,编写Dao层的接口 这一步本身没有什么可以说的,但是呢,如果可以简化,可以直接使用注解而不使用xml注册的方式实现接口,具体的使用方法可以参考我之前的文章。
Mybatis:注解的使用
第三步,配置Mapper 显然这是非常关键的一步,这一步要编写sql语句,那么编写sql语句就要传入或者传出参数
先来说select语句
1 2 3 <select id="getUserById" parameterType="int" resultType="com.wang.pojo.User"> select * from mybatis.user where id = #{id} </select>
这里的传入参数来源于之前编写的接口,如果要根据两个参数来查询该怎么办呢?
使用map作为参数传入!
在设计interface的时候,可以直接用map作为参数传入,不知道这是bug还是mybatis设计者的有意为之,但是说实话,这种方法非常方便。
1 2 3 4 5 6 7 User selectUser(Map<String,Object> map); <!--对象中的属性,可以直接取出来 传递map的key--> <select id="selectUser" parameterType="map" resultType="user"> select * from db.user where userid = #{userid} and password = #{passWord}; </select>
如果涉及联表查询或者多个表查询的情况,就需要继续拿出resultMap了
这里介绍两种情况,多对一和一对多
多对一就是,例如有个学生表和老师表,多个学生对同一个老师,这就是多对一的情况
是要进行链表查询的
第一种思路,按照查询嵌套处理,想法就是用resultmap把一个对应关系改到另一个查询操作上
1 2 3 4 5 6 7 8 9 10 11 12 13 14 15 16 17 18 19 20 <!-- 思路: 1. 查询所有的学生信息 2. 根据查询出来的学生的tid,寻找对应的老师! 子查询 --> <select id="getStudent" resultMap="StudentTeacher"> select * from student </select> <resultMap id="StudentTeacher" type="Student"> <result property="id" column="id"/> <result property="name" column="name"/> <!--复杂的属性,我们需要单独处理 对象: association 集合: collection --> <association property="teacher" column="tid" javaType="Teacher" select="getTeacher"/> </resultMap> <select id="getTeacher" resultType="Teacher"> select * from teacher where id = #{id} </select>
第二种思路,按照结果嵌套处理。
1 2 3 4 5 6 7 8 9 10 11 12 13 14 <!--按照结果嵌套处理--> <select id="getStudent2" resultMap="StudentTeacher2"> select s.id sid,s.name sname,t.name tname from student s,teacher t where s.tid = t.id; </select> <resultMap id="StudentTeacher2" type="Student"> <result property="id" column="sid"/> <result property="name" column="sname"/> <association property="teacher" javaType="Teacher"> <result property="name" column="tname"/> </association> </resultMap>
下面继续介绍一对多的情况,显然,此时得到的结果一定包含数组,所以标签名改成collection
仍然有两种方式
1 2 3 4 5 6 7 8 9 10 11 12 13 14 15 16 17 18 19 20 21 22 23 24 25 26 27 28 29 30 31 32 33 34 <!--按结果嵌套查询--> <select id="getTeacher" resultMap="TeacherStudent"> select s.id sid, s.name sname, t.name tname,t.id tid from student s,teacher t where s.tid = t.id and t.id = #{tid} </select> <resultMap id="TeacherStudent" type="Teacher"> <result property="id" column="tid"/> <result property="name" column="tname"/> <!--复杂的属性,我们需要单独处理 对象: association 集合: collection javaType="" 指定属性的类型! 集合中的泛型信息,我们使用ofType获取 --> <collection property="students" ofType="Student"> <result property="id" column="sid"/> <result property="name" column="sname"/> <result property="tid" column="tid"/> </collection> </resultMap> <!--按查询嵌套处理--> <select id="getTeacher2" resultMap="TeacherStudent2"> select * from mybatis.teacher where id = #{tid} </select> <resultMap id="TeacherStudent2" type="Teacher"> <collection property="students" javaType="ArrayList" ofType="Student" select="getStudentByTeacherId" column="id"/> </resultMap> <select id="getStudentByTeacherId" resultType="Student"> select * from mybatis.student where tid = #{tid} </select>
第四步,在核心配置文件中注册 这一步也没有什么可以说的,下面继续说一下,再后面的步骤,就是我们最后怎么拿到这些数据
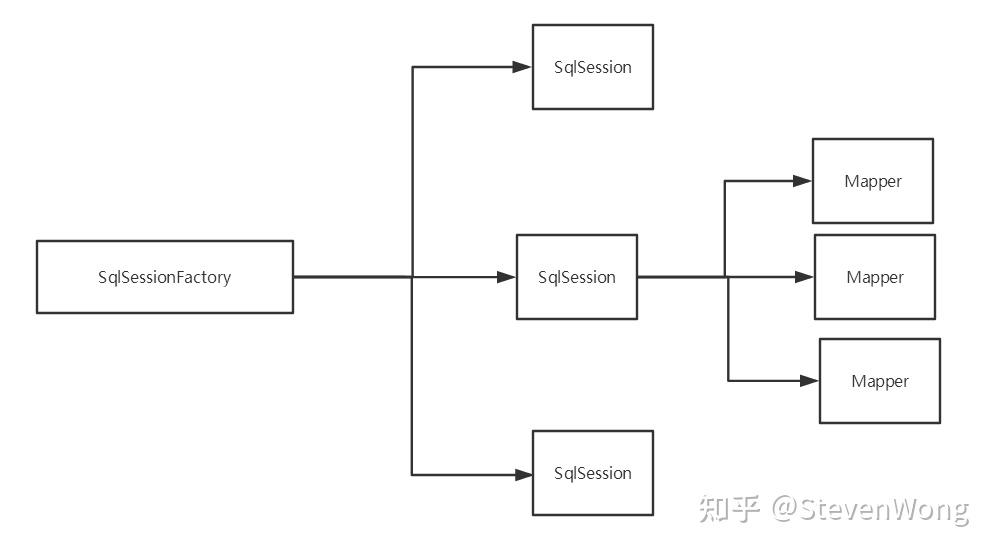
这就要说一下Mybatis的生命周期了
SqlSessionFactoryBuilder
读取了核心配置文件之后,创建出来sqlSessionFactory之后,它就没用了
SqlSessionFactory
可以把它想象成为数据库连接池,源源不断的创建sqlSession供我们使用
sqlSession
连接到连接池的一个请求!
SqlSession 的实例不是线程安全的,因此是不能被共享的
根据这些特性,可以编写工具类,
1 2 3 4 5 6 7 8 9 10 11 12 13 14 15 16 17 18 19 20 21 22 23 24 //sqlSessionFactory --> sqlSession public class MybatisUtils { private static SqlSessionFactory sqlSessionFactory; static{ try { //使用Mybatis第一步:获取sqlSessionFactory对象 String resource = "mybatis-config.xml"; InputStream inputStream = Resources.getResourceAsStream(resource); sqlSessionFactory = new SqlSessionFactoryBuilder().build(inputStream); } catch (IOException e) { e.printStackTrace(); } } //既然有了 SqlSessionFactory,顾名思义,我们就可以从中获得 SqlSession 的实例了。 // SqlSession 完全包含了面向数据库执行 SQL 命令所需的所有方法。 public static SqlSession getSqlSession(){ return sqlSessionFactory.openSession(); } }
测试代码:
1 2 3 4 5 6 7 8 9 10 11 12 13 14 15 16 17 @Test public void test(){ //第一步:获得SqlSession对象 SqlSession sqlSession = MybatisUtils.getSqlSession(); //方式一:getMapper UserDao userDao = sqlSession.getMapper(UserDao.class); List<User> userList = userDao.getUserList(); for (User user : userList) { System.out.println(user); } //关闭SqlSession sqlSession.close();